Introduction
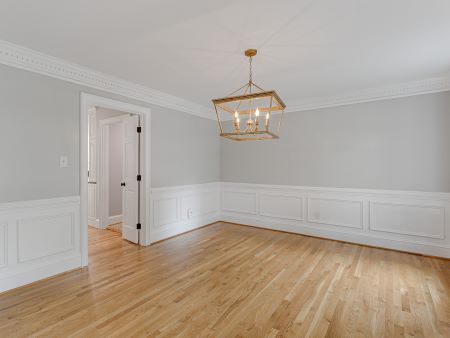
Installing prefinished hardwood floors is a great way to add warmth and elegance to any home. If you're considering this upgrade in Vancouver, WA, understanding the process is essential. Not only does it help you prepare for the project, but it also provides insights into the various options available, including materials, styles, and installation techniques. In this comprehensive guide, we will explore every facet of prefinished hardwood floor installation in Vancouver, WA.
Why Choose Prefinished Hardwood Flooring?
Prefinished hardwood flooring comes with a host of advantages that make it an appealing choice for homeowners. Unlike unfinished hardwood flooring, which requires sanding and finishing on-site, prefinished options are ready to install straight out of the box. This means less mess and a quicker turnaround time for your renovation project.
Additionally, prefinished hardwood floors often come with better durability due to the factory-applied finishes that are more robust than those applied on-site. This quality ensures that your floors can withstand daily wear and tear while maintaining their beauty. Furthermore, if you're searching for a reliable Hardwood Flooring Company in Vancouver WA, you’ll find that many companies offer a wide range of prefinished options tailored to meet your design needs.
The Step-by-Step Process of Prefinished Hardwood Floor Installation in Vancouver WA
Embarking on the journey of installing prefinished hardwood flooring can feel daunting. However, breaking down the process into manageable steps makes it easier and more approachable. Here’s what you need to know:
1. Assess Your Space
Before diving into installation, assess your space carefully. Consider factors like room size, layout, existing floor coverings, and moisture levels—all crucial elements influencing your decision.
2. Choose the Right Material
When selecting prefinished hardwood flooring:
- Species: Common choices include oak, maple, hickory, and walnut. Finish: Look for durable finishes that suit your lifestyle. Thickness: Standard thickness ranges from ¾ inch to ½ inch.
Consult a local Hardwood Flooring Company in Vancouver WA to get expert advice tailored to your specific needs.
3. Prepare the Subfloor
Preparation is key! Ensure your subfloor is clean and dry before installation begins:
- Remove old floor coverings. Repair any damage found on the subfloor. Clean thoroughly to eliminate dust and debris.
This step is vital as it affects how well your new flooring will perform over time.
4. Acclimate Your Flooring
Acclimation allows your new planks to adjust to room temperature and humidity levels before installation. Lay them flat for at least 48 hours in the room where they will be installed.
5. Gather Tools & Materials
Assemble all necessary tools prior to starting:
- Tape measure Saw (miter or table) Hammer Spacers Level Pneumatic nail gun (if applicable)
Having everything on hand streamlines the process significantly.
6. Install Underlayment
Consider installing an underlayment if required by your manufacturer or if you’re laying over concrete or tile floors. This layer adds cushioning and sound dampening while providing moisture protection.
7. Start Laying Planks
Begin laying planks along the longest wall or focal point of the room:
Use spacers against walls for expansion gaps. Start with full-length boards; cut pieces as needed. Stagger seams by at least six inches on subsequent rows for a natural look.
8. Nail or Glue Planks Down
Depending on whether you're using nailed-down or glue-down methods:
- For nailed-down installations: Install nails at angles through tongue-and-groove joints. For glue-down: Apply adhesive evenly across the subfloor as directed by manufacturers.
9. Cut Planks as Necessary
You may need to cut planks around doorways or corners using a miter saw for accurate fits—measure twice!
10. Install Transition Strips and Baseboards
Finally, once all planks are laid down securely:
Install transition strips between different flooring types. Reattach baseboards or install new ones for a polished finish.Maintenance Tips Post-Installation
Once you complete your prefinished hardwood floor installation in Vancouver WA:
Regularly sweep or vacuum to remove dirt. Use damp mops with appropriate cleaners designed for hardwood care. Avoid excessive water exposure—standing water can warp floors!FAQs About Prefinished Hardwood Floor Installation
1. What is prefinished hardwood flooring?
Answer: Prefinished hardwood flooring comes with protective coatings applied at the factory level before installation, making it ready for immediate use upon completion of laying down.
2. How long does prefinished hardwood floor installation take?
Answer: Depending on room size and complexity (approximately one day), professional installations generally require less time than unfinished wood installations due to fewer steps involved.
3. Can I install prefinished hardwood over existing floors?
Answer: Yes! You can replace existing floor coverings like carpet or tile with prefinished hardwood as long as they provide a stable base without height discrepancies or moisture issues.
4. Do I need special tools for installation?
Answer: While basic carpentry tools suffice (like saws and hammers), specialized equipment such as pneumatic nail guns may be helpful based on chosen installation methods.
5. Is acclimation necessary before installing?
Answer: Absolutely! Acclimating wood helps prevent warping caused by humidity changes once installed—allowing it time yields better results overall!
6. Will my new floors scratch easily?
Answer: While no floor is completely scratch-proof especially in high traffic areas; choosing quality finishes designed specifically against scratches https://www.hardwoodflooringvancouverwa.com/ Hardwood Flooring Vancouver WA will enhance durability significantly!
Conclusion
The step-by-step process of prefinished hardwood floor installation in Vancouver WA doesn’t have to be overwhelming when approached methodically! By understanding what’s involved—from assessing space and selecting materials through proper maintenance—you set yourself up not only for success during installation but also enjoy lasting beauty from these stunning wooden surfaces afterward!
Whether it's redoing an entire home’s flooring system altogether; seeking expert guidance from dependable professionals like Woodfloor Masters Inc., whose services span across various aspects related including repair/replacement/refinishing/installation aspects can alleviate common concerns faced regarding such projects! If you’re ready to transform your living space with beautiful new flooring today – reach out now!